
There are numerous ways to get decent macro performance without a dedicated lens, including bellows, extension tubes, and close-up lenses. Each comes with their own set of pros and cons, but proper equipment for each will still run you $150+ in general. On the other hand, using a vintage 50mm lens and a couple of cheap adapters, you can accomplish similar results for a fraction of the cost, and with (almost) any DSLR.
What you'll need:

- Camera body (1)
- Old 50mm lens with aperture ring (2)
- The appropriate mount adaptor (3) or
- A threaded adaptor to match the lens' filter thread and your camera mount (4)
- Short tripod (5)
With very little shopping around, the last three items on that list can be had for about $30 combined, which is ever so slightly cheaper than getting a dedicated macro lens. When looking for a 50mm lens, be sure to get one with an aperture ring, as you'll be able to manually stop down the lens that way. Don't worry about a lens' max aperture either - you'll have to stop down anyway. Personally, I use a Minolta MD 50mm f/1.4 since I had it lying it around, but a Minolta MD 50mm f/2.0 can be found in the $10-$20 range quite easily and will do the job just as well. As an added bonus, the flange distance of the old Minolta system is only slightly longer than on Canon EF and Nikon F mounts, so any adaptor will act as a small extension tube from the get-go.
To those wondering why I recommend a 50mm lens specifically, it's because they have the right balance between working distance and magnification. For example, if you were to use a 28mm lens, you'd have significantly more magnification in each situation (0.63x instead of 0.35x when forward mounted), but very little working distance; so little that the lens will actually cast a shadow on your subject.
For whichever method you choose (or skip choosing and try both), the following is a quick rundown on each.
To those wondering why I recommend a 50mm lens specifically, it's because they have the right balance between working distance and magnification. For example, if you were to use a 28mm lens, you'd have significantly more magnification in each situation (0.63x instead of 0.35x when forward mounted), but very little working distance; so little that the lens will actually cast a shadow on your subject.
 |
| The difference in magnification between methods is significant, but each has its drawbacks |
Forward Adapting

This method is pretty straightforward, involving mounting the lens on an MD-EF adaptor. I got mine for under $15 from ebay via a Hong Kong dealer. Because of the flange distance differential mentioned in the previous section, the adaptor acts like an extension tube. Because of that the lens won't be able to focus to infinity (or anywhere near it), it's the trade-off for the increased magnification.
Focus is achieved in the usual way, by turning the lens' focusing ring. But because of the adaptor you won't be able to focus on anything more than about a foot away. Minimum magnification will be 0.17x, and maximum will be 0.35x, or slightly over 1/3 life size. That in itself isn't anything spectacular, but it's still better than most lenses can manage. You can also add one of those cheap non-electronic extension tubes for more magnification if you wanted to, but you do have to contend with additional light loss when doing so.
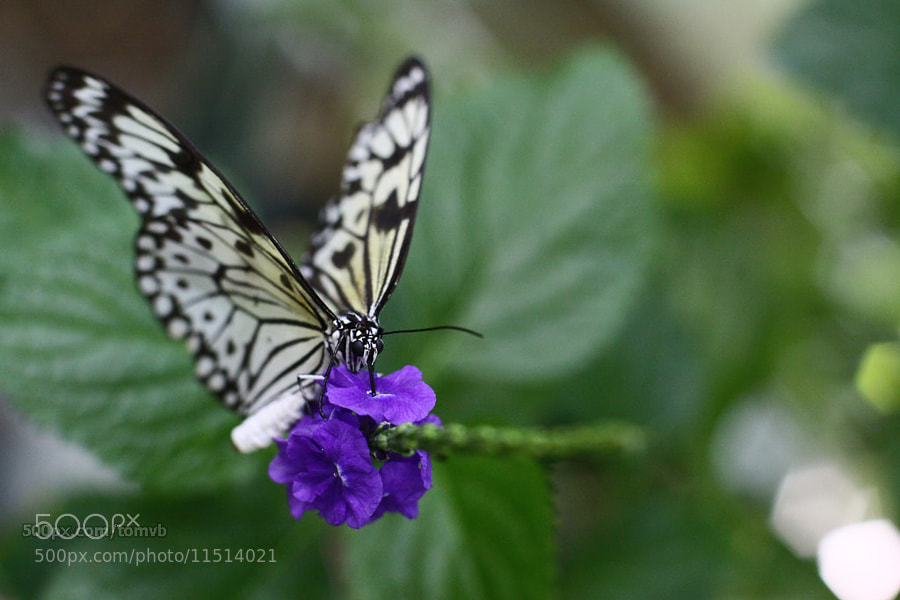 |
| ISO 1600, 1/160sec, f/11 |
 |
| Manual focusing isn't an issue on slow subjects |
Sadly this method won't be of much use to Canon users for much longer, since the new 18-55 IS STM kit lens has a max magnification of 0.36x at 55mm, and retains autofocus and auto aperture control while doingso. So if you want more magnification, you can might want to try...
Reverse Adapting

If you found the 1/3 life-size magnification of forward-mounting or extension tubes, then you may want to try reverse-adapting your lens instead. For this you'll need a threaded adaptor that matches both your camera mount and the thread size of the lens you're reversing. For example, my Minolta 50mm f/1.4 has a 49mm filter thread, so I got an EF-49mm adaptor. You'll get to 0.85x life-size with this setup, almost matching what dedicated macro lenses can do.
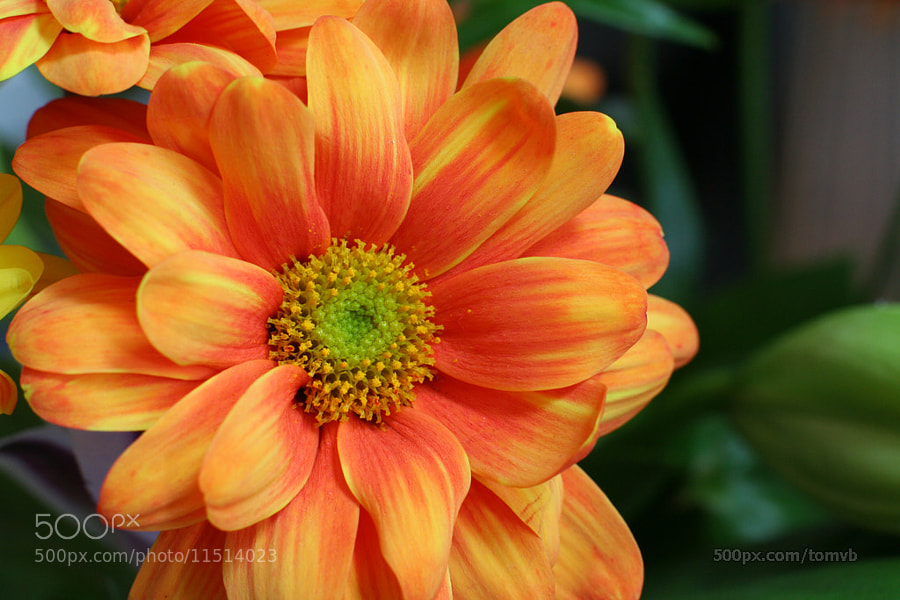
 |
| Reverse-mounted, f/16, ISO 3200 |
Also, every camera I've ever reversed a lens on has had trouble metering properly, giving me up to two stops of over or under exposure. You'll have to either dial in some exposure compensation, or use manual exposure.
With any of the methods mentioned above, the same basic strategies apply for getting decent images. You'll want to stop down far enough to get a decent amount (f/8-16) of depth-of-field, and you'll have to raise the ISO high enough to allow for a decent shutter speed if you aren't using a tripod. However, stopping down with the lenses involves physically stopping down the aperture (it's like holding down the DoF preview button) which translates to dark viewfinders, making it hard to focus. If your camera has liveview capabilities, use it, it'll make your life easier. If you don't, try focusing the lens while at its max aperture, then stopping down just before taking the shot.
As for optical quality, it's pretty darn good. The only real downside is colour fringing, which is especially noticeable when using a reversed lens against a bright background. Fortunately this can be easily removed in post-processing.
Alternatively, if all of this intimates you, you could just buy an old Canon 35-80 and modify it.
No comments:
Post a Comment